Gitlab 自动发布流程构建
Gitlab 自动发布流程构建
一:CI/CD是什么?
我们的开发模式经历了如下的转变:瀑布模型->敏捷开发→DevOps(Development、Operations的组合词,是一组过程、方法与系统的统称)
后来随着DevOps的兴起,出现了持续集成(Continuous Integration)、持续交付(Continuous Delivery) 、持续部署(Continuous Deployment) 的新方法,关于持续集成、持续交付、持续部署,总结如下:
- 持续集成的重点是将各个开发人员的工作集合到一个代码仓库中。通常,每天都要进行几次,主要目的是尽早发现集成错误,使团队更加紧密结合,更好地协作。
- 持续交付的目的是最小化部署或释放过程中固有的摩擦。它的实现通常能够将构建部署的每个步骤自动化,以便任何时刻能够安全地完成代码发布(理想情况下)。
- 持续部署是一种更高程度的自动化,无论何时对代码进行重大更改,都会自动进行构建/部署。
持续集成的好处是什么?
持续集成可以使问题尽早暴露,从而也降低了解决问题的难度,正如老马所说,持续集成无法消除bug,但却能大大降低修复的难度和时间。
持续交付的好处是什么?
持续交付的好处在于快速获取用户反馈;适应市场变化和商业策略的变化。开发团队保证每次提交的修改都是可上线的修改,那么决定何时上线,上线哪部分功能则完全由产品业务团队决定。
虽然持续交付有显著的优点,但也有不成立的时候,比如对于嵌入式系统的开发,往往需要软硬件的配合。
持续部署的好处是什么?
持续部署的目标是通过减少批量工作的大小,并加快团队工作的节奏,帮助开发团队在其开发流程中消除浪费。这使团队能够一直处于一种可持续的平稳流状态, 让团队更容易去创新、试验,并达到可持续的生产率
二:GitLab的安装
三:GitLab Runner
3.1 GitLab Runner 简介
- GitLab Runner 是一个开源项目,用于运行作业并将结果发送会GitLab
- 与GitLab结合使用,GitLab CI 是GitLab随附的用于协调作业的开源持续击集成服务
- GitLab Runner 是用Go编写的,可以在Linux、Windows和MacOS操作系统上运行
- 容器部署需要使用最新Docker版本,GitLab Runner 需要最小的Docker v1.13.0
- GitLab Runner 版本应与GitLab版本同步。(避免版本不一致导致的差异)
- 可以根据需要配置任意数量的Runner
3.1.1 GitLab Runner 特点
作业运行控制:同时执行多个作业
作业运行环境:
在本地、使用Docker容器、使用Docker容器并通过SSH执行作业。
使用Docker容器在不同的云和虚拟化管理程序上自动缩放。
连接到远程SSH服务器。
支持Bash,Windows Batch和Windows PowerShell。
允许自定义作业运行环境。
自动重新加载配置,无需重启。
易于安装,可作为Linux,macOS和Windows的服务。
3.1.2 GitLab Runner的类型与状态
- 类到
- shared共享类型,运行整个平台项目的作业(gitlab)
- group项目组类型,运行特定group下的所有项目的作业(group)
- specific项目类型,运行指定的项目作业(project.)
- 状态
- locked:锁定状态,无法运行项目作业
- paused:.暂停状态,暂时不会接受新的作业
3.2 GitLab Runner安装
**系统环境:**可以在Linux,mac0S,FreeBSD和Windows.上安装和使用GitLab Runner。
**部署方式:**二进制文件、rpm/deb软件包、Docker、Kubernetes
3.2.1 通过包管理工具安装
Add GitLab's official repository:.添加官方仓库
# For Debian/Ubuntu/Mint
curl -L https://packages.gitlab.com/install/repositories/runner/gitlab-runner/script.deb.sh | sudo bash

# For RHEL/CentoS/Fedora
curl -L https://packages.gitlab.com/install/repositories/runner/gitlab-runner/script.rpm.sh | sudo bash
更新runner
# For Debian/Ubuntu/Mint
sudo apt-get update
sudo apt-get install gitlab-runner

# For RHEL/Centos/Fedora
sudo yum update
sudo yum install gitlab-runner
Install the latest version of GitLab Runner:安装最新版本
# For Debian/Ubuntu/Mint
sudo apt-get install gitlab-runner

# For RHEL/CentoS/Fedora
sudo yum install gitlab-runner
To install a specific version of GitLab Runner:安装指定版本
# for DEB based systems
apt-cache madison gitlab-runner
sudo apt-get install gitlab-runner=10.0.0

# for RPM based systems
yum list gitlab-runner --showduplicates | sort -r
sudo yum install gitlab-runner-10.0.0-1
3.2.2 手动deb/rpm包安装
下载软件包
- https://gitlab-runner--downloads.s3.amazonaws.com/latest/index.html上找到最新的文件名和选项。
- 选择一个版本并下载二进制文件,如文档所述,该文件用于下载任何其他标记的GitLab Runner发行版。
例如,对于Debian?或Ubuntu:
curl -LJO https://gitlab-runner-downloads.s3.amazonaws.com/latest/deb/gitlab-runner_<arch>.deb
dpkg -i gitlab-runner_<arch>.deb
dpkg -i gitlab-runner <arch>.deb
例如,对于CentOS或Red Hat Enterprise Linux:
curl -LJO https://gitlab-runner-downloads.s3.amazonaws.com/latest/rpm/gitlab-runner <arch>.rpm
rpm -i gitlab-runner_<arch>.rpm
rpm -Uvh gitlab-runner_<arch>.rpm
3.2.3 二进制文件安装
下载指定版本:将上面URL中的latest切换为v12.9。
# Linux x86-64
sudo curl -L --output /usr/local/bin/gitlab-runner https://gitlab-runner-downloads.s3.amazonaws.com/latest/binaries/gitlab-runner-linux-amd64
# Linux x86
sudo curl -L --output /usr/local/bin/gitlab-runner https://gitlab-runner-downloads.s3.amazonaws.com/latest/binaries/gitlab-runner-linux-386
# Linux arm
sudo curl -L --output /usr/local/bin/gitlab-runner https://gitlab-runner-downloads.s3.amazonaws.com/latest/binaries/gitlab-runner-linux-arm
# Linux arm64
sudo curl -L --output /usr/local/bin/gitlab-runner https://gitlab-runner-downloads.s3.amazonaws.com/latest/binaries/gitlab-runner-linux-arm64
添加执行权限
sudo chmod +x /usr/local/bin/gitlab-runner
创建一个gitlab用户
sudo useradd --comment 'GitLab Runner'--create-home gitlab-runner --shell /bin/bash
安装并作为服务运行
sudo gitlab-runner install --user=gitlab-runner --working-directory=/home/gitlab-runner
sudo gitlab-runner start
更新
# 停止服务
sudo gitlab-runner stop
# 下载新版本二进制包
sudo curl -L --output /usr/local/bin/gitlab-runner https://gitlab-runner-downloads.s3.amazonaws.com/latest/binaries/gitlab-runner-linux-amd64
# 赋予执行权限
sudo chmod +x /usr/local/bin/gitlab-runner
# 启动服务
sudo gitlab-runner start
3.2.4 Mac OS系统下的安装 - 手动
下载二进制包
sudo curl --output /usr/local/bin/gitlab-runner https://gitlab-runner-downloads.s3.amazonaws.com/latest/binaries/gitlab-runner-darwin-amd64
授予其执行权限:
sudo chmod +x /usr/local/bin/gitlab-runner
将Runner作为服务安装并启动它:
cd ~
gitlab-runner install
gitlab-runner start
3.2.5 Mac OS 系统下的安装 - 自动
安装,启动
brew install gitlab-runner
brew services.start gitlab-runner
更新
gitlab-runner stop

sudo curl -o /usr/local/bin/gitlab-runner https://gitlab-runner-downloads.s3.amazonaws.com/latest/binaries/gitlab-runner-darwin-amd64

sudo chmod +x /usr/local/bin/gitlab-runner

gitlab-runner start
3.3 GitLab Runner 注册
- 注册步骤:
- 获取runner token -> 进行注册
- GitLabRunner类型
- shared:运行整个平台项目的作业(gitlab)
- group:运行特定group下的所有项目的作业(group)
- specific:运行指定的项目作业(project)
- locked:无法运行项目作业
- paused:不会运行作业
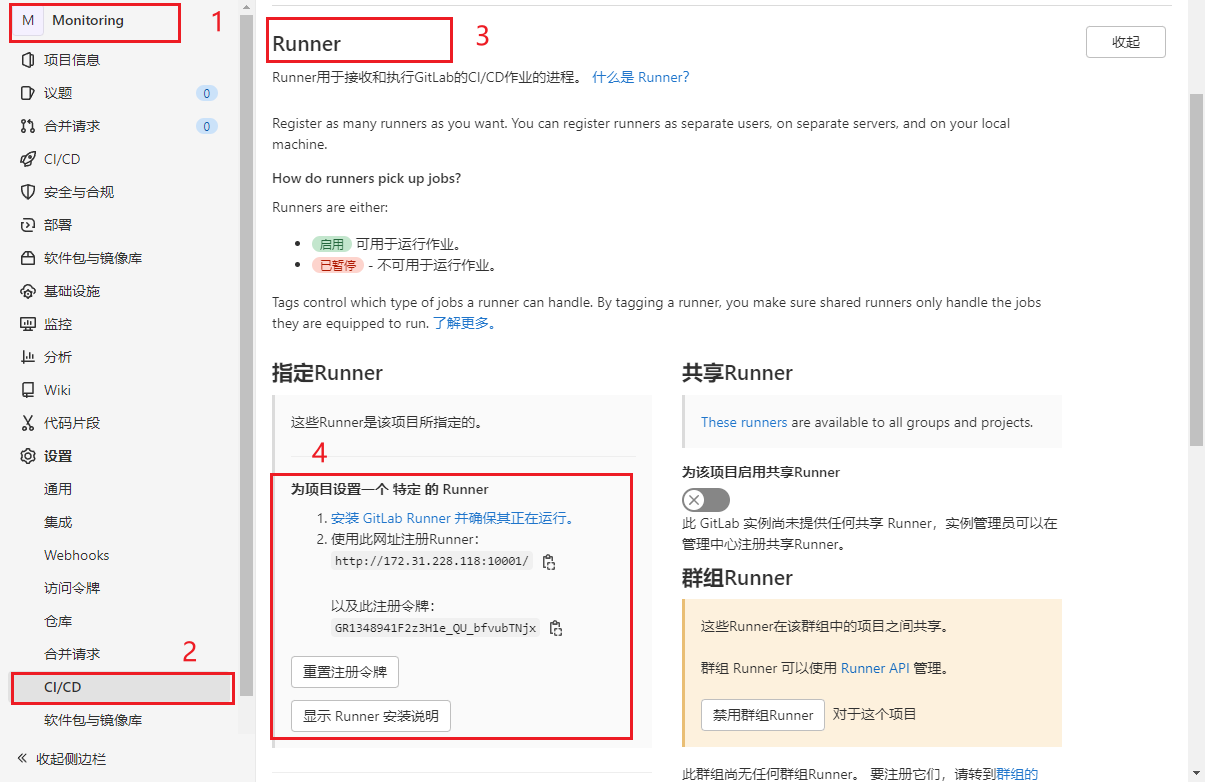
3.3.1 获取注册token
获取Shared类型的Token

获取Group类型的Token
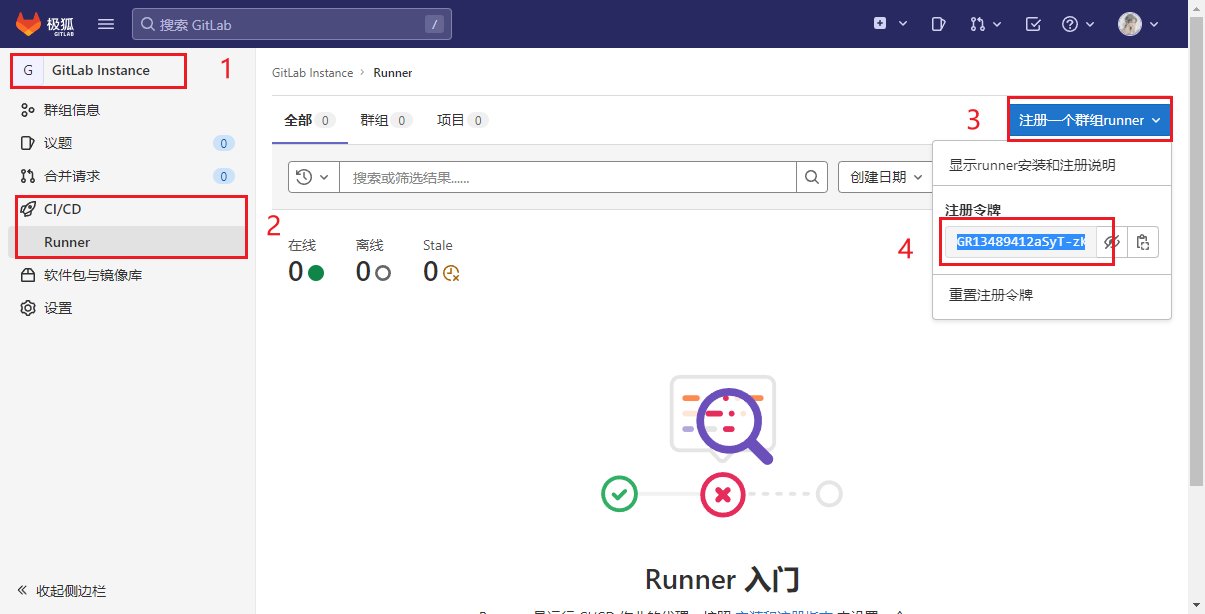
获取Special类型的Token
3.3.2 GitLab Runner 的注册
runner的注册采用的是交互式的方式:
通过执行sudo gitlab-runner register进行注册,过程中需要输入以下一些参数:
# gitlab 的url:
http://127.0.0.1:10001
# runner 的 token :
DR9XssZPEdqymnQBVDpb
# runner 的描述信息 - 用于辨识该注册所属的群组或项目,可以设置为方便区分的字符串:
test-shard
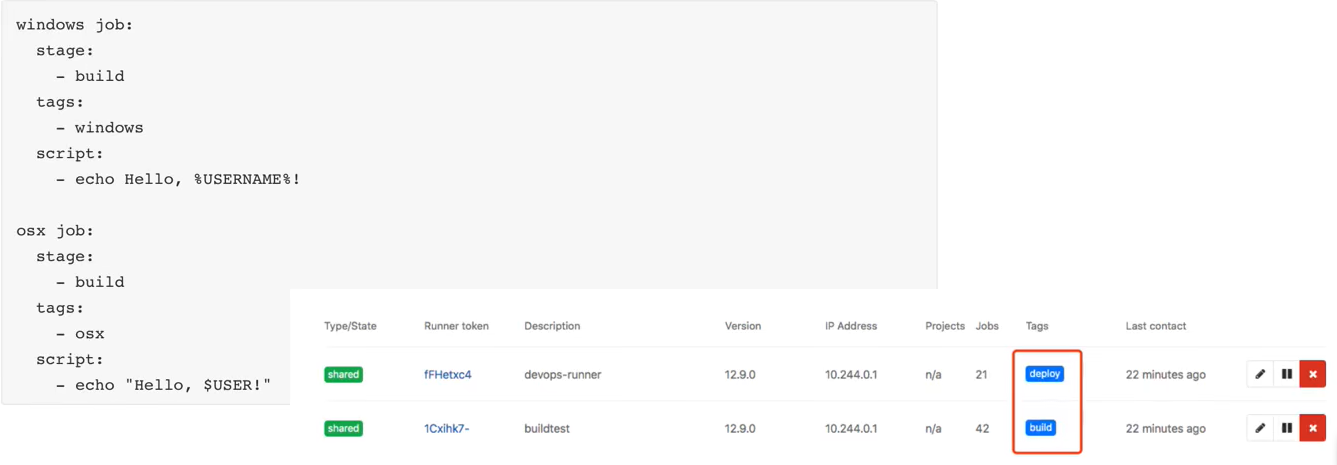
# runner 的 tag - 标签用于后续CI配置中选择此执行器,后期可以通过gitlab界面更改:
build
# 选择执行器 - 后续CI任务的执行方式,docker方式运行的请选择docker :
shell
下面是一个完整的注册流程:
xuliang@xuliang-vm:~$ sudo gitlab-runner register
Runtime platform                                    arch=amd64 os=linux pid=12303 revision=0d4137b8 version=15.5.0
Running in system-mode.

Enter the GitLab instance URL (for example, https://gitlab.com/):
http://127.0.0.1:10001
Enter the registration token:
DR9XssZPEdqymnQBVDpb
Enter a description for the runner:
[xuliang-vm]: test-shard
Enter tags for the runner (comma-separated):
build,deploy
Enter optional maintenance note for the runner:

Registering runner... succeeded                     runner=DR9XssZP
Enter an executor: docker-ssh, shell, ssh, kubernetes, docker-ssh+machine, instance, custom, docker, parallels, virtualbox, docker+machine:
shell
Runner registered successfully. Feel free to start it, but if it's running already the config should be automatically reloaded!

Configuration (with the authentication token) was saved in "/etc/gitlab-runner/config.toml"
3.4 GitLab Runner 执行器
3.4.1 背景介绍
GitLab CI/CD的流水线真正的执行环境是GitLab Runner提供的执行器,为了满足各种各样的需求,GitLab CI/CD支持的执行器有很多种,最常用的是Docker, shell,Kubernets三种。每一种执行器都与自己的特性,了解各个执行器的特性,并选择合适的执行器才能让我们流水线更加可靠,稳健。下面我就给大家讲解一下各种执行器的特性。
3.4.2 执行器类型
GitLab Runner支持的执行器有以下几种:
- SSH
- Shell
- Parallels
- VirtualBox
- Docker
- Docker Machine (auto-scaling)
- Kubernetes
- Custom
GitLab Runner 支持的执行器有GitLab Runner的安装方式有关也和宿主机环境有关。
3.4.3 执行器特性对比1
| 执行器 | SSH | Shell | VirtualBox | Parallels | Docker | Kubernetes | Custom |
|---|---|---|---|---|---|---|---|
| 每次build清空build环境 | ✗ | ✗ | ✓ | ✓ | ✓ | ✓ | conditional (4) |
| 如果以前的克隆存在,请重新使用它 | ✓ | ✓ | ✗ | ✗ | ✓ | ✗ | conditional (4) |
| runner文件系统访问受到保护(5) | ✓ | ✗ | ✓ | ✓ | ✓ | ✓ | conditional (4) |
| 迁移runner机器 | ✗ | ✗ | partial | partial | ✓ | ✓ | ✓ |
| 复杂的构建环境 | ✗ | ✗(2) | ✓(3) | ✓(3) | ✓ | ✓ | conditional (4) |
| 调试构建问题 | 容易 | 容易 | 困难 | 困难 | 中等 | 中等 | 中等 |
标注解释
- 迁移时需要在新的机器上安装所依赖的应用,服务,工具包
- 要求所有依赖手动安装
- 例如使用 https://www.vagrantup.com/docs/providers/virtualbox
- 取决于您正在配置的环境类型。它可以在每个构建之间完全隔离或共享。
- 当runner的文件系统访问不受保护时,作业可以访问整个系统,包括运行程序的令牌,以及其他作业的缓存和代码。执行器被标记为 ✓ 默认情况下不允许运行程序访问文件系统。但是,安全缺陷或某些配置可能会允许作业从其容器中跳出并访问文件系统宿主runner
对于ssh和shell执行器,在构建完成后,并不会自动清空构建目录。其他执行器则会。所以如果你用的是Shell执行器,会在Runner的build目录下找到构建的文件和产物,而当你是使用Shell执行器时,如果以及克隆过项目了,则会重新使用它。虽然shell执行器使用的宿主机环境,运行足够快,但在使用时,必须手动安装所有构建环境,依赖,而且可能存在越权的问题。如果你是一个追求速度,可以使用Shell执行器,如果你追求灵活性,稳健,可以使用Dokcer执行器,如果你对自动扩缩容有一定要求,建议上Kubernets。
3.4.4 执行器特性对比2
| Executor | SSH | Shell | VirtualBox | Parallels | Docker | Kubernetes | Custom |
|---|---|---|---|---|---|---|---|
| 保护变量 | ✓ | ✓ | ✓ | ✓ | ✓ | ✓ | ✓ |
| GitLab Runner 执行命令行 | ✗ | ✓ | ✗ | ✗ | ✓ | ✓ | ✓ |
支持.gitlab-ci.yml :image | ✗ | ✗ | ✗ | ✗ | ✓ | ✓ | ✓ (via $CUSTOM_ENV_CI_JOB_IMAGE |
支持.gitlab-ci.yml: services | ✗ | ✗ | ✗ | ✗ | ✓ | ✓ | ✓ |
支持.gitlab-ci.yml: cache | ✓ | ✓ | ✓ | ✓ | ✓ | ✓ | ✓ |
支持.gitlab-ci.yml: artifacts | ✓ | ✓ | ✓ | ✓ | ✓ | ✓ | ✓ |
| 跨阶段制品传递 | ✓ | ✓ | ✓ | ✓ | ✓ | ✓ | ✓ |
| 使用 GitLab 私有镜像仓库 | n/a | n/a | n/a | n/a | ✓ | ✓ | n/a |
| 集成 Web terminal | ✗ | ✓ (UNIX) | ✗ | ✗ | ✓ | ✓ (1) | ✗ |
在上面的执行器特性对比中需要注意的是如果是Shell执行器,无法使用docker镜像和services关键词。即使你的宿主机已经安装的Docker。此外控制台调试之后Docker与k8s以及,unix的shell执行器可以使用。
3.5 GitLab Runner 命令总结
gitlab-runner删除无效runner
gitlab-runner verify --delete --name xxx
查看帮助
gitlab-runner --help
gitlab-runner <command> --help
配置文件路径
# 配置文件
# 当gitlab-runner作为超级用户(root)执行时,在* nix系统上
/etc/gitlab-runner/config.toml

# 当gitlab-runner以非root身份执行时,在* nix系统上
~/.gitlab-runner/config.toml

# 在其他系统上
./config.toml
注册
# 注册
gitlab-runner register --name my-runner --url http://gitlab.example.com --registration-token my-registration-token

# 或者通过在register命令之前配置环境变量:
export CI_SERVER_URL=http://gitlab.example.com
export RUNNER_NAME=my-runner
export REGISTRATION_TOKEN=my-registration-token
export REGISTER_NON_INTERACTIVE=true
gitlab-runner register

# 非互动注册,可以在非交互/无人值守模式下使用注册。
gitlab-runner register --non-interactive <other-arguments>
注销
# 取消注册所有附加的注册者
gitlab-runner unregister --all-runners

# 要取消注册特定的跑步者,首先通过执行gitlab-runner list获取注册者的详细信息
gitlab-runner list
# 再根据信息注销,按注册令牌
gitlab-runner unregister --url http://gitlab.example.com/ --token t0k3n
# 按名字
gitlab-runner unregister --name hj_project
安装gitlab-runner install
#复制gitlab-runner到/usr/bin/目录下
cp /root/gitlab-runner-linux-amd64  /usr/bin/gitlab-runner

#赋予可执行权限
chmod +x /usr/bin/gitlab-runner

# 创建符号链接文件
ln -s  /usr/bin/gitlab-runner /usr/local/bin/gitlab-runner

# 创建 GitLab Runner用户
sudo useradd --comment 'GitLab Runner' --create-home gitlab-runner --shell /bin/bash

# 修改gitla-runner密码
echo "gitlab-runner" | passwd --stdin gitlab-runner
# 安装
gitlab-runner install --user=gitlab-runner --working-directory=/home/gitlab-runner

# 把服务添加成随机启动
chkconfig gitlab-runner on

# 给gitl-runner用户可以sudo执行/usr/local/bin/gitlab-runner的权限
echo "Cmnd_Alias CMD = /usr/bin/systemctl,/usr/bin/gitlab-runner,/usr/bin/vim" >>/etc/sudoers.d/gitlab-runner
echo "gitlab-runner ALL=(ALL)       NOPASSWD:CMD" >>/etc/sudoers.d/gitlab-runner

# 运行
gitlab-runner start
卸载
!/bin/bash
# 卸载gitlab-runner

# 停止服务
gitlab-runner stop

# 取消随机启动
chkconfig gitlab-runner off

# 卸载服务
gitlab-runner uninstall

# 清理文件
rm -rf /etc/gitlab-runner
rm -rf /usr/local/bin/gitlab-runner
rm -rf /usr/bin/gitlab-runner
rm -rf /etc/sudoers.d/gitlab-runner

# 删除用户
userdel -r gitlab-runner
3.6 运行流水线任务
脚本
stages:
  - build
  - deploy

build:
  stage: build
  tags:
    - build
  only:
    - master
  script:
    - echo "mvn-clean
    - echo "mvn install"

deploy:
  stage: deploy
  tags:
    - deploy
  only:
    - master
  script:
    - echo "hello deploy"
四:GitLab PipLine
GitLab CI的每个实例都有一个称为Lint的嵌入式调试工具,该工具可以验证.gitlab--ci.yml文件的内容
4.1 GitLab Pipline 语法
4.1.1 Job
在每个项目中,使用名为.gitlab-ci.yml的YAML文件配置GitLab CI/CD管道。在文件中可以定义一个或多个作业(job)。每个作业必须具有唯一的名称(不能使用关键字),每个作业是独立执行的。作业定义了在约束条件下进行相关操作,每个作业至少要包含一个script。
job1:
  script:"execute-script-for-jobl"
job2:
  script:"execute-script-for-job2"
这里在pipeline中定义了两个作业,每个作业运行不同的命令。命令可以是shell或脚本。
一个样例
before_script:
  echo "before-script !!"

variables:
  DOMAIN: example.com

stages:
  - build
  - test
  - codescan
  - deploy

build:
  before_script:
    - echo "before-script in job"
  stage: build
  script:
    - echo "mvn clean
    - echo "mvn install"
    - echo "$DOMAIN"
  after_script:
    - echo "after script in buildjob"

unittest:
  stage: test
  script:
    - echo "run test"

deploy:
  stage: deploy
  script:
    - echo "hello deploy"
    - sleep 2;

codescan:
  stage: codescan
  script:
    - echo "codescan"
    - sleep 5;

after_script:
  - echo "after-script !!"
4.1.2 Script
每个作业至少要包含一个script。
job:
  script:
    - uname -a
    - bundle exec rspec
**注意:**有时,script命令需要用单引号或双引号引起来。例如,包含冒号命令(😃,需要加引号,以便被包裹的YML解析器知道来解释整个事情作为一个字符串,而不是一个"键:值"对。使用特殊字符时要小心::,{,},[,],,,&,*,#,?,|,-,<,>,=,!,%,@,```
4.1.3 before_script
用于定义一个命令,该命令在每个作业之前运行。必须是一个数组。指定的script与主脚本中指定的任何脚本串联在一起,并在单个shell中一起执行。
before_script失败导致整个作业失败,其他作业将不再执行。作业失败不会影响after_script运行。
4.1.4 after_script
用于定义在每个作业(包括失败的作业)之后运行的命令。
这必须是一个数组。
指定的脚本在新的shell中执行,与任何before_script或script脚本分开。
after_script失败不会影响作业失败。
4.1.5 stages
用于定义作业可以使用的阶段,并且是全局定义的。
同一阶段的作业并行运行,不同阶段按顺序执行。
stages:
  - build
  - test
  - codescan
  - deploy

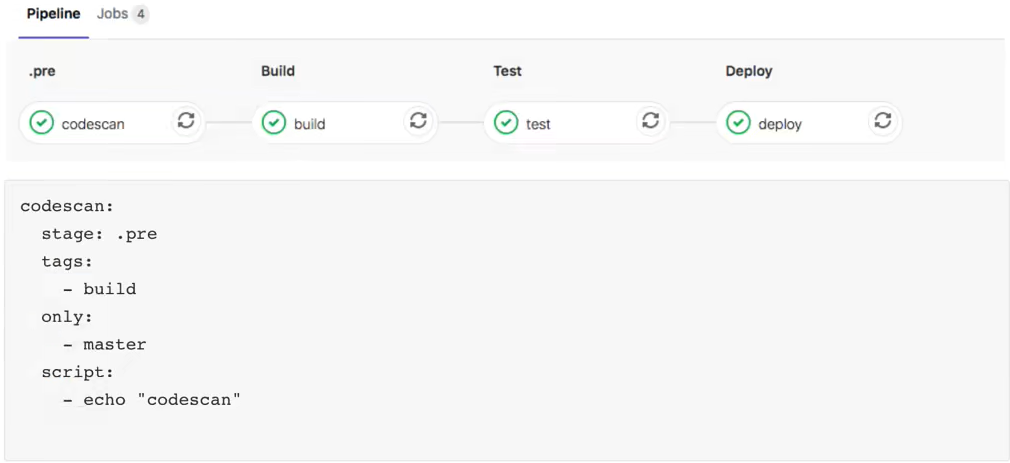
4.1.6 .pre&.post
.pre始终是整个管道的第一个运行阶段,.post始终是整个管道的最后一个运行阶段。用户定义的阶段都在两者之间运行。.pre和.post的顺序无法更改。如果管道仅包含.pre或.post阶段的作业,则不会创建管道。
4.1.7 stage
是按Job定义的,并且依赖于全局定义的stages。它允许将作业分为不同的阶段,并且同一stage作业可以并行执行(取决于特定条件)。

可能遇到的问题:阶段并没有并行运行。在这里我把这两个阶段在同一个runner运行了,所以需要修改runner每次运行的作业数量。默认是1,改为10.
vim /etc/gitlab-runner/config.toml 更改后自动加载无需重启。
concurrent 10
4.1.8 variables
定义变量,pipeline变量、job变量。job变量优先级最大。
4.1.9 tags
用于从允许运行该项目的所有Runner列表中选择特定的Runner,在Runner注册期间,您可以指定Runner的标签。
4.1.10 allow_failure
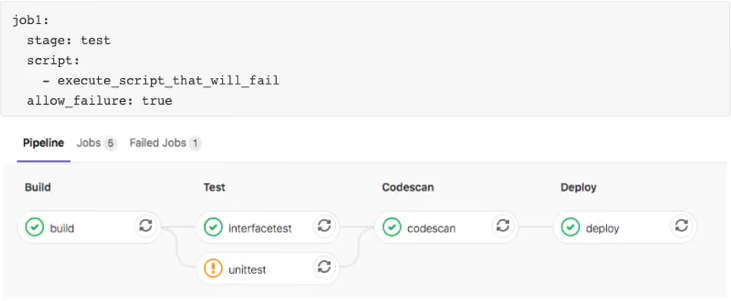
allow_failure允许作业失败,默认值为false。启用后,如果作业失败,该作业将在用户界面中显示橙色警告。但是,管道的逻辑流程将认为作业成功/通过,并且不会被阻塞。假设所有其他作业均成功,则该作业的阶段及其管道将显示相同的橙色警告。但是,关联的提交将被标记为"通过",而不会发出警告。
4.1.11 when
控制作业的运行
- on_success: 前面阶段中的所有作业都成功时才执行作业,默认值。
- **on_failure:**当前面阶段出现失败时执行。
- **always:**总是执行作业。
- **manual:**手动执行作业。
- **delayed:**延迟执行作业。
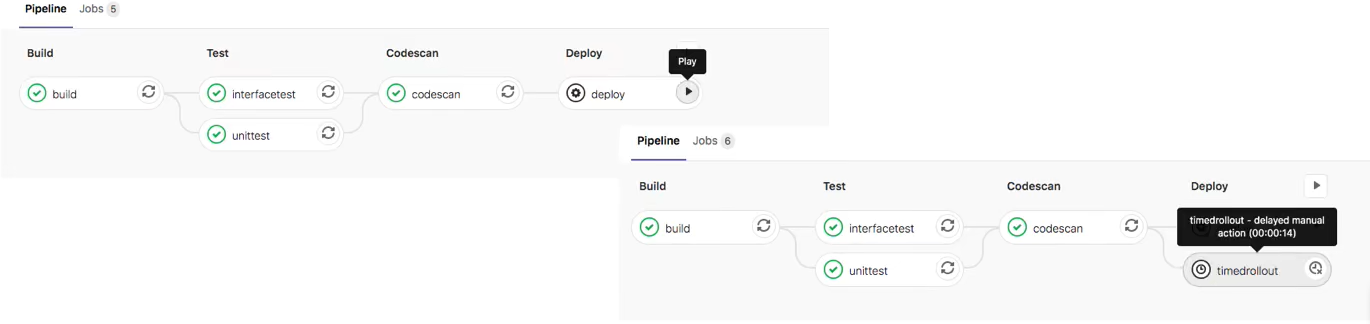
demo
timedrollout:
  stage: deploy
  script:
    - echo 'Rolling out 10% ... '
  when: delayed
  start_in: '30'
4.1.12 retry
- 配置在失败的情况下重试作业的次数。
- 当作业失败并配置了retry,将再次处理该作业,直到达到retry关键字指定的次数。
- 如果retry设置为2,并且作业在第二次运行成功(第一次重试),则不会再次重试。retry值必须是一个正整数,等于或大于0,但小于或等于2(最多两次重试,总共运行3次)。
精确匹配错误
默认情况下,在失败情况下重试作业。max:最大重试次数when:重试失败的错误类型
- always:在发生任何故障时重试(默认)。
- unknown_failure:当失败原因未知时。
- script_failure:脚本失败时重试。
- api_failure:API失败重试。
- stuck_or_timeout_failure:作业卡住或超时时。
- runner_system_failure:运行系统发生故障。
- missing_dependency_failure:如果依赖丢失。
- runner_unsupported:Runner不受支持。
- stale_schedule:无法执行延迟的作业。
- job_execution_timeout:脚本超出了为作业设置的最大执行时间。
- archived_failure:作业已存档且无法运行。
- unmet_prerequisites:作业未能完成先决条件任务。
- scheduler_failure:调度程序未能将作业分配给运行scheduler_failure。
- data_integrity_failure:检测到结构完整性问题。
demo
unittest:
  stage: test
  tags:
    - build
  only:
    - master
  script:
    - ech "run test"
  retry:
    max: 2
    when:
      - script_failure
4.1.13 timeout
作业级别的超时可以超过项目级别超时,但不能超过Runner特定的超时。
build:
  script: build.sh
  timeout: 3 hours 30 minutes

test:
  script: rspec
  timeout: 3h 30m
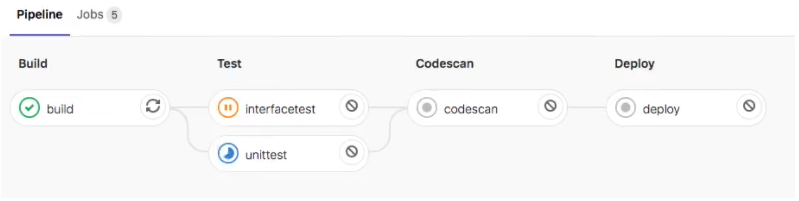
4.1.14 parallel
并行作业
- 配置要并行运行的作业实例数,此值必须大于或等于2并且小于或等于50。
- 这将创建N个并行运行的同一作业实例.它们从job_name 1/N到job_name N/N依次命名。
实验脚本demo
before script:
  - echo "before-script!!"

variables:
  DOMAIN: example.com

stages:
  - build
  - test
  - codescan
  - deploy

build:
  inherit:
    default: true
    variables: true
  before script:
    - echo "before-script in job"
  stage: build
  tags:
    - build
  only:
    -master
  script:
    - echo "mvnclean
    - echo "mvn install"
    - echo "S(DOMAIN)"
    - false && true exit_code=$?
    - if [ $exit_code -ne 0 ]; then echo "Previous command failed"; fi;
    - sleep 2;
  after script:
    - echo "after script in job"

unittest:
  stage: test
  tags:
    - build
  only:
    - master
  script:
    - echo "run test"

interfacetest:
  stage: test
  tags:
    - build
  only:
    - master
  script:
    - echo "run test"
    - sleep 2;

deploy:
  stage: deploy
  tags:
    - deploy
  only:
    master
  script:
    - echo "hello deploy"
    - sleep 2;
  when: manual
  allow_failure: true

timedrollout:
  stage: deploy
  script:
    - echo 'Rolling out 10% ... '
  when: delayed
  start_in: '30'

codescan:
  stage: codescan
  tags:
    - build
  only:
    - master
  script:
    - echo "codescan"
    - sleep 5;
  after_script:
    - echo "after-script"
4.1.15 only & except 限制分支标签
简单了解,逐渐被rules替代了
- only和except用分支策略来限制jobs构建:
- only定义哪些分支和标签的git项目将会被job执行。
- except定义哪些分支和标签的git项目将不会被job执行。
job:
  # use regexp
  only:
    - /^issue-.*$/
  # use special keyword
  except:
    - branches
| Value | Description |
|---|---|
| branches | 当管道的Git引用是分支时. |
| tags | 当管道的Git引用是标签时, |
| api | 当第二个管道API触发了管道时(不是触发器API) |
| external | 使用除GitLab以外的CI服务时. |
| pipelines | 对于多项目触发器,使用带有CI_JOB_TOKEN的API创建. |
| pushes | 管道由用户的git push触发. |
| schedules | For scheduled pipelines. |
| triggers | 对于使用触发令牌创建的管道, |
| web | 对于使用GitLab UI中的"运行管道"按钮创建的管道(在项目的Pipelines下). |
| merge_requests | 创建或更新合并请求时(请参阅管道以了解合并请求) |
| external_pull_requests | 在GitHub上创建或请求外部拉取请求时(有关外部拉取请求,请参见管道). |
| chat | 对于使用GitLab ChatOps命令创建的作业, |
4.1.16 rules 构建规则
- rules允许按顺序评估单个规则,直到匹配并为作业动态提供属性。
- rules不能only/except与only/except组合使用。
可用的规则:
- if(如果条件匹配)
- changes(指定文件发生变化)
- exists(指定文件存在)
,
rules-if-条件匹配
- 如果DOMAIN的值匹配,则需要手动运行。
- 不匹配on_success。
- 条件判断从上到下,匹配即停止。
- 多条件匹配可以使用&& ||
variables:
  DOMAIN: example.com

codescan:
  stage: codescan
  tags:
    - build
  script:
    - echo "codescan"
    - sleep 5;
  #parallel:5
  rules:
    - if: '$DOMAIN =="example.com"
      when:manual
	- when:on_success
rules-changes-文件变化
- 接受文件路径数组。
- 如果提交中Jenkinsfile文件发生的变化则为true。
codescan:
  stage: codescan
  tags:
    - build
  script:
    - echo "codescan"
    - sleep 5;
  #parallel:5
  rules:
    - changes:
      - Jenkinsfile
      when:manual
    - if:'$DOMAIN ="example.com"
      when:on_success
    - when:on success
rules-exists-文件存在
- 接受文件路径数组。
- 当仓库中存在指定的文件时操作。
codescan:
  stage: codescan
  tags:
    - build
  script:
    - echo "codescan"
    - sleep 5;
  #parallel:5
  rules:
    - exists:
      - Jenkinsfile
      when: manual
    - changes:
      - Jenkinsfile
      when: on_success
    - if;'$DOMAIN =="example.com"
      when: on_success
    - when: on_success
rules-allow_failure-允许失败
- 使用allow failure: true
- rules: 在不停止管道本身的情况下允许作业失败或手动作业等待操作。
job:
  script: "echo Hello,Rules!"
  rules:
    - if:'$CI_MERGE_REQUEST_TARGET_BRANCH_NAME =="master"
      when: manual
      allow_failure: true
在此示例中,如果第一个规则匹配,则作业将具有以下when: manual和allow_failure: true。
4.1.17 workflow
workflow -rules - 管道创建
- 顶级workf1ow关键字适用于整个管道,并将确定是否创建管道。
- when: 可以设置为always或never, 如果未提供,则默认值always。
variables:
  DOMAIN: example.com

workflow:
  rules:
    - if: '$DOMAIN "example.com""
    - when: always
4.1.18 cache
缓存
- 存储编译项目所需的运行时依赖项,指定项目工作空间中需要在j0b之间缓存的文件或目录。
- 全局cache定义在job之外,针对所有job生效。job中cache优先于全局。
cache:paths
- 在job build中定义缓存,将会缓存target目录下的所有.jar文件。
- 当在全局定义了cache:paths会被job中覆盖。以下实例将缓存target目录。
build;
  script: test
  cache:
    paths:
    - target/*.jar
cache:
  paths:
    - my/files

build:
  script: echo "hello"
  cache:
    key: build
    paths:
      - target/
cache: key - 缓存标记
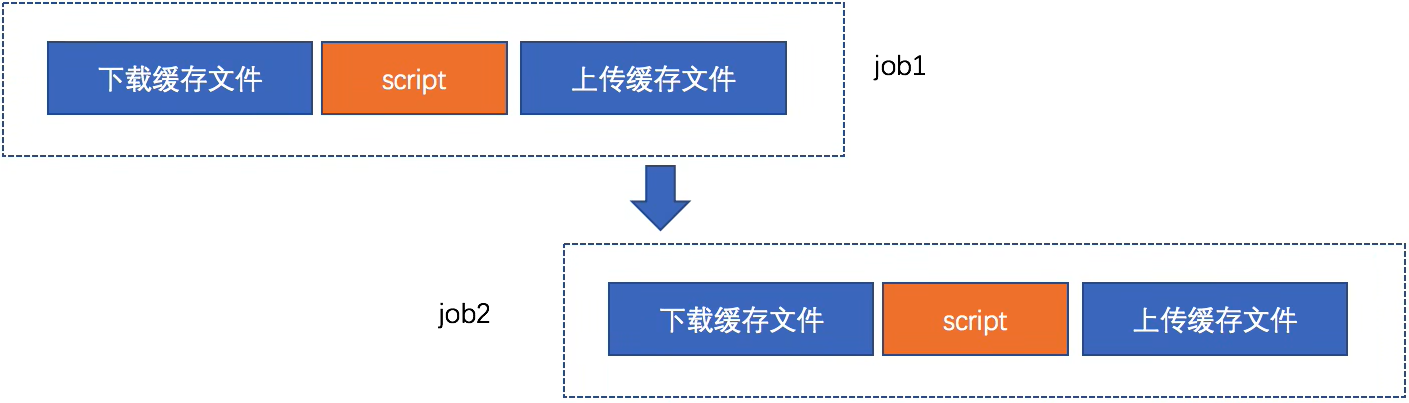
为缓存做个标记,可以配置job、分支为key来实现分支、作业特定的缓存。为不同job定义了不同的cache:key时,会为每个job分配一个独立的cache。cache:key 变量可以使用任何预定义变量,默认default。从GitLab9.0开始,默认情况下所有内容都在管道和作业之间共享。
按照分支来设置缓存
cache:
  key: $[CI_COMMIT_REF_SLUG}
cache: key: files:
文件变化自动创建缓存
files:文件发生变化自动重新生成缓存(files最多指定两个文件),提交的时候检查指定的文件。根据指定的文件生成密钥计算SHA校验和,如果文件未改变值为default。
cache:
  key:
    files:
      - Gemfile.lock
      - package.json I
  paths:
    - vendor/ruby
    - node_modules
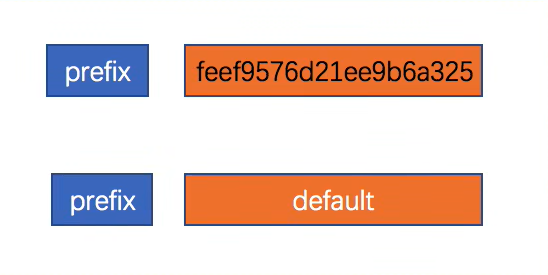
cache: key: prefix:
组合生成SHA校验和
prefix: 允许给定prefix的值与指定文件生成的秘钥组合。在这里定义了全局的cache,如果文件发生变化则值为rspec-xxx111111111222222,未发生变化为rspec-default。
cache:
  key:
    files:
      - Gemfile.lock
    prefix: $[CIJOB_NAME)
  paths:
    - vendor/ruby
  rspec:
    script:
    - bundle exec rspec
cache: policy: - 缓存策略
默认:在执行开始时下载文件,并在结束时重新上传文件。
policy:pull 跳过下载步骤,policy: push 跳过上传步骤
4.1.19 artifacts
用于指定在作业成功或者失败时应附加到作业的文件或目录的列表。作业完成后,工件将被发送到GitLab,并可在GitLab UI中下载。
制品,就是Java项目编程完成后的Jar包。其他语言的可能是一些XMl文件,或者HTML文件等。
artifacts:
  paths:
    - target/
artifacts-制品创建
default-job:
  script:
    - mvn test -U
  except:
    - tags

release-job:
  script:
    - mvn package -U
  artifacts:
  paths:
    - target/*.war
  only:
    - tags